|
BUILDING A MONTEREY STRAT! |
|
BUILDING A MONTEREY STRAT! |
|
This is an article about transforming a very average Mexican Strat into a
killer instrument inspired by the guitar Jimi Hendrix played and burned
at the 1967 Monterey Pop Festival.
We recently saw a documentary celebrating the 40th anniversary of the event, and the Hendrix segment really blew us all away. It was his American debut as part of the "Jimi Hendrix Experience", and it was truly a watershed event for culture and guitar! Wouldn't it be cool to build a Hendrix tribute Strat as a family project? Here we go....hope you enjoy the journey! |
|
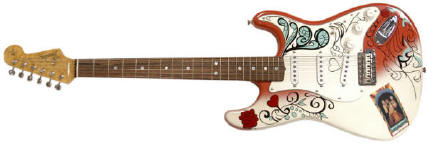
| This is what the original, mega-buck 1997 Fender Custom Shop Strat Hendrix Tribute Strat looks like. Note that it is based a early 60's Fiesta Red Strat with some custom graphics. The graphics, originally painted by Mr. Hendrix and reproduced by an artist for the Custom Shop, are in black, turquoise, and dark red. The white stripe across the top is done with flat white spray paint. Note: We absolutely hate the sticker Fender placed on the guitar. You can see it -- it looks like a backstage pass with a photo of Mr. Hendrix burning the guitar. Very odd for a megabuck guitar. Warning: We don't advocate or ever support making "fake" vintage or expensive guitars. We are building this one for personal use. As always, we don't recommend buying expensive guitars on eBay because the fakes are just too convincing. If you wind up buying one of the Custom Shop Monterey Strats (they do turn up on eBay from time to time), make sure the paperwork is airtight. |
|
|
|
|
|
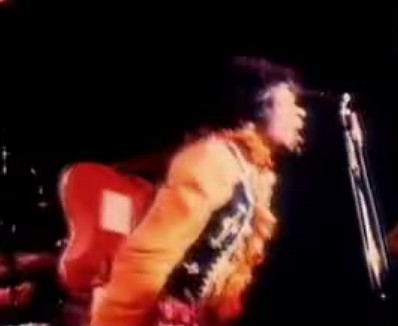
Apparently there are no color photos of the original
guitar. These are screenshots from YouTube of the original concert. Here is an interesting shot of the real guitar being wrangled by Mr. Hendrix minutes before it was smashed and burned. Note how orange the Fiesta Red looks. It is also interesting to note that Mr. Hendrix probably didn't do a meticulous tear down of the guitar prior to painting. I bet the flat white paint, or at least overspray, was on the bridge and the pickguard of the original. Note that the transition of Fiesta Red to flat white covers a pretty large area on the original. |
|
|
Here is a shot of the back of the guitar, again minutes before it met its fiery fate. Note the tremolo cover is on the back and there is a fairly sharp paint line along the top of the contour. We also believe that the contour has some overspray on it After looking at a number of photos, we think it is probably fair to assume that Mr. Hendrix didn't use masking tape on the edge. Rather, he probably just had the guitar laying on its back and sprayed the edges that way. |
|
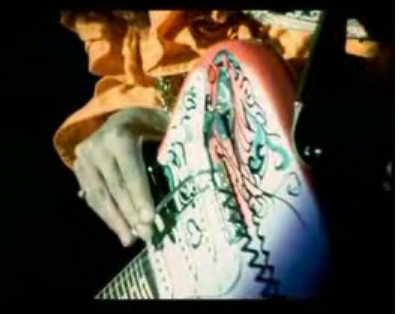
| Finally, another
shot of the original. Note how much thicker the painted lines are on this
guitar when compared to the reissue. It is clear that Fender had to spruce up their reissue to get the Guitar Center crowd to plop down the dough. It is also fair to say that most of these guitars were likely bought by vintage guitar speculators, some of whom probably had never heard of the Monterey Pop Festival. Note how the white paint overspray goes to the input jack. It is probably fair to assume that Mr. Hendrix used some masking tape across the input jack, bridge, and pickguard. We'll get our paint line somewhere in the middle. |
|
|
Do you have a donor? Of course. We built this Yngwie clone out of a Mexican Strat we found on eBay. The body was kind of banged up, and was covered in the thickest poly/epoxy finish you've ever seen. The guitar sounded OK, but it just never got us fired up. We've got the scalloped neck tucked away for safe keeping, and we are planning on building a Yngwie "Duck" clone with it. However, this Strat will be reunited with its original neck and rebuilt into the Hendrix-style Strat. Maybe it should be a Monterrey Strat.... |
|
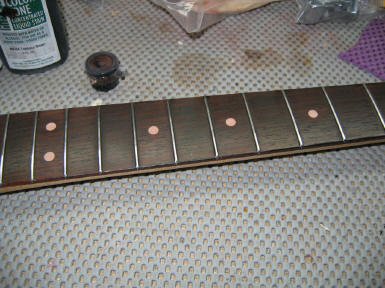
| Step
1: Fix the Neck.
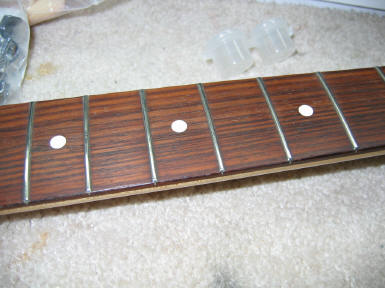
One of the big problems with the Mexican Strats is the awful looking "rosewood-like" fingerboards you get sometimes. We decided that if we were going to build a cool clone, we had to make the fingerboard look like it was cut back in the day when clear-cutting a rain forest for guitars was no big deal. The top photo is the "before" while the bottom is the "after". I made a dye solution of denatured alcohol and TransTint dyes. The formula is five drops of Tobacco Brown and one drop of red in the alcohol base mixed in a little plastic covered paint container. I got them at Michael's craft store, and they come in a package with about 20 containers. I rubbed the dye into the fingerboard with a Q-Tip. After drying, I wiped off the fingerboard and reapplied two more times. The fret markers looked really nice after the dye job. Not clay, mind you, but an aged MOP, which is correct for this era. The dots on the "after" are not red -- it is just the light. The have a nice aged look, and the fingerboard looks much more believable. We scored some vintage reissue tuners on eBay, and we'll install those later after finishing body. |
|
|
|
|
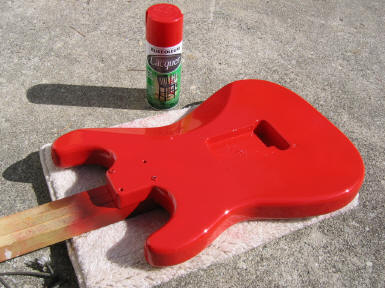
| Step 2:
Spray the body with Red. We were looking around Home Depot and found this cool Rustoleum paint called "Chinese Red". It was labeled "specialty lacquer", it was cheap, and we decided to give it a try. We scuffed the poly with 220 grit sandpaper, and started to paint. Once we got a few coats on, the paint started looking really red, and much more so than the cap on the can. We tried to order some Fiesta Red from the ReRanch, but they were closed. We turned to Paintscratch.com for some auto paint, just like Fender used. |
|
|
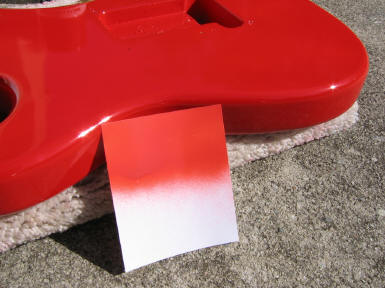
We did the research and found that Fiesta Red was a 1956
Ford Thunderbird color. We went to the PaintScratch web site, found
the color, specified single stage (not clear coat), and voila...a week
later, the paint showed up. Here is a comparison to the Rustoleum. Is it that big of a deal? Yes, if you want to do it right. The Rustoleum is really pretty -- sort of a Dakota Red, and we really hate to strip off this cool looking paint. OK...time to strip the body. Note to self -- remember this paint for the next project. It is really fantastic. It goes on incredibly smooth and looks great. |
|
| Out comes the CitruStrip. We glopped it on and jammed the entire body
into a plastic trash bag. The trash bag keeps the stripper wet, and
makes it
last much longer. The next day we pulled the body out of the bag and started the laborious task of cleaning this mess up. The red came right off, and the poly finish underneath didn't even budge. |
|
Go to Page 2 |
|
| ATTACK HOME BUILDER'S GALLERY | ||||||||||||||||||||||||||||||||||||||||||||||||||||
|
||||||||||||||||||||||||||||||||||||||||||||||||||||