| The FM Special #1 is a very special guitar.
Special for several reasons, not the least of which it is the first guitar I built
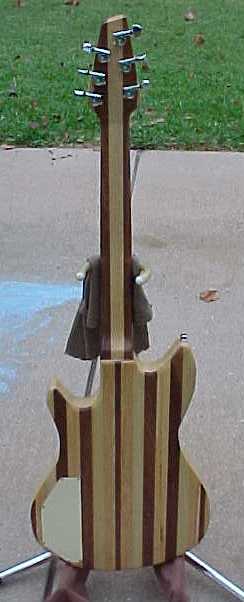
completely from "scratch." It has an interesting story -- here goes… In the summer of 1997 my family and I moved to Texas. When we arrived, we visited some very old, dear friends who lived near by. Sadly, they were getting ready to move to Colorado but we had the chance to catch up on old times during our couple of weeks of overlap. Before they left they had a huge garage sale. My wife and I decided to check it out, so on one Saturday morning we headed over. We looked through all of the stuff they had for sale, but nothing was really that interesting. I was poking around in his garage and I saw a pile of laminated wood. They were "chunks" of poplar, walnut, ash, and oak laminated together with Gorilla Glue. I asked him what he had built, and he told me he was working on some sort of Medieval French fighting appliance. You see, he was into the Society for Creative Anachronism (SCA) "dress up in armor and fight" scene, and this was just the latest in his attempts to get an edge. He had several odd pieces and a couple of 3/4 poplar boards. I asked him how much he wanted, and he replied "take them and make something." I wasn't sure what I wanted to build, but I loaded the wood into the back of the Explorer. When I got home I started the analysis, and I decided that I could build a guitar out of the wood he had given me. Since I had never built a guitar, I bought a copy of Mel Hiscock's book Make Your Own Electric Guitar and started doing the work. I decided to resaw the wood into 1/4" thick strips and laminate them to a poplar core. My first step was to figure out what the guitar would look like. I drew several designs and made the posterboard cutouts like I had done with the original Mako. I finally decided on the FM shape, and went to work. I also decided that the guitar would have a set neck; a fateful decision! I laminated the poplar core with Gorilla Glue and had a 1 1/2" thick body onto which I would glue the other wood. I didn't think I had enough wood to make a neck, so I bought a big plank of ash to make a neck. I laminated the wood for the neck, but then realized I did have enough -- see FM 2 for what I did with the ash! I had a friend at the wood shop resaw the laminate on his Shop Smith. He wound up with several large pieces, enough for me to cover the front and back of the guitar. I joined the two laminate pieces on both the front and back with a thin 1/4" piece of walnut I got out of the scrap pile at the wood shop. The color matched my other walnut almost perfectly, and the join was very clean. When I got all of the body wood together, I marked the body shape on the wood and cut the body out with a band saw. Very tedious -- the cutaways were very tough. I cleaned up the cutaways with an oscillating table sander, and the body wound up almost exactly as I had envisioned it. I rounded the edges of the body with a 3/8" roundover bit. I then cut a mortise out of the body almost exactly the same as the Spare Parts Les Paul's. It had a flat bottom and was rounded in the back just like the Gibson. I built a jig to profile the top because I wanted the top to be contoured. From the end of the fingerboard to the neck-body joint, the top drops, allowing the fingerboard to be flush with the top while there is about a 2-degree neck angle. I used a Mototool to profile the top and a wood rasp to do the final shaping. I decided to route a large control cavity on the back of the guitar. I used the posterboard to mark the size of the plate on the back, and made a plywood template to route the cavity out. At this point in the construction I did not know exactly what my control layout would be, but I knew I wanted a big enough pocket to allow all types of knobs and switches, plus a preamp if I wanted it. I kind of made this one up as I went along, but it would up being OK-- one lesson learned is to watch for wood chipout when you are routing. Once the cavity was complete I drilled out the jack hole with a 1" paddle bit. I made the cover plate out of Stew-Mac creme plastic, and set the body aside.
I drilled two 1/4" holes in the fingerboard template, and used them to drill holes in both the fingerboard and the neck blank. Using two dowels I was able to get a consistent lineup between the fingerboard and neck (another trick I learned from the Parts Les Paul). Once the fingerboard was shaped I inlayed 1/4" mother of pearl dots and side markers. Lesson Learned: Take your time with this, because if you screw it up there is no going back! Once the inlay was complete I fretted the fingerboard per Dan Erlewine's Fretwork Complete book from Stew-Mac. Once the frets were in, I glued the fingerboard to the neck. I laminated a piece of flamed maple on the headstock and rough shaped the nut. The neck was almost ready. I test fit the neck to the body, and it was "pretty" close. Over the neck couple of weeks (remember, I do guitar work on weekends) I sanded, fitted, sanded, fitted, sanded, and fitted ad nauseum. When the neck was fitted, I stuck the neck to the body with some tape and completed the measurements for the pickup routes and bridge position. I routed the pickup cavities with a Stew-Mac template and pattern-following bit. I used a Sears 1/4" extra long "aircraft" bit to route the wiring channel (NOTE: This was very tedious -- I should have done this before I laminated the wood on the face and back). I measured scale length about fifty times, and I decided to drill those holes after I got the neck attached. I used a Les Paul Junior-type wraparound tailpiece because I am convinced it is the ultimate for sustain. Don't wring your hands about intonation -- they work out fine if you make the correct measurements. The next step was to attach the neck. I used TiteBond and a number of clamps. I taped the body around the joint to ensure there was minimal squeeze-out onto the bare wood. I removed the clamps after about 12 hours, and the neck was set. The next day I remeasured the stud position for the LP Junior type bridge, and I took the guitar to the wood shop and drilled the bridge holes. When I got home I installed the bridge, the tuners, and the nut, then strung the guitar up. It actually worked! I played the guitar for a couple of days in all of its unfinished glory. I completed a fret level, recrowing, and polishing of the frets, as well as reworking the nut. The guitar was playing great; the time had come to complete the finish. I placed the knobs on the guitar with double stick tape. I played with their positions, and finally decided on a volume for each pickup and a selector switch. The volume closest to the bridge would be for the treble pickup, and the other volume would be for the neck pickup. The switch is a standard three-position switch -- down is treble, middle is both, and up is neck. Once I decided on the position I drilled the holes. I removed all of the hardware from the guitar and started the finish. I sanded the entire guitar to a 320-grit smoothness and taped-off the fingerboard with masking tape. First I stained the headstock with vintage amber water-based aniline dye. The wood's curl really soaked up the stain, and the flame really became pronounced. Next I applied MinWax Satin Hand-Rubbed Poly -- I bought it at Lowe's. I applied several coats to the entire guitar, and it really made the wood look nice. I used a special technique on the neck given to me by a "luthier" friend. I will post it on the forum soon. The bottom line is the neck feels super, and it resembles a 50-year old finish! Just awesome. It took me one weekend to complete the finish, and I let the guitar dry for one week. The next weekend I wired the guitar up. The pickups are V-2 humbuckers out of a late-70's Ibanez Artist. They have a distinct PAF tone, and I really like their compatibility with the woods on the guitar. I bought them from a friend for $50; a great buy. The wiring kit was from Stew-Mac, as is the bridge, the fingerboard, and StrapLocks, and the Grover Mini Tuners. The frets are really tall -- kind of scalloped, in a way. The neck profile wound up resembling an old Les Paul. As a matter of fact, it is very similar to my Jeff Beck Les Paul. When I got it finished, I had the guitar-building bug. I play this guitar every day, and it just keeps sounding better. Thanks for all of the folks that helped me with this project, especially my friend Jim Grainger at Custom Fretted Instruments in Sparta, TN. He is the man. The lesson learned -- you can do it! What are you waiting for? |