|
| From Dave Slusser,
Summerhill Studios, Pennsylvania USA: Details:
I’m new to Nitro and GuitarAttack has helped to make
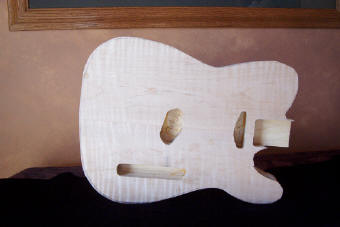
the transition from base coat / clear coat painless. Second, DO NOT EVER
finish one of these kits until you are ABSOLUTELY CERTAIN everything fits
and it works, and ALL the fine tuning is done. For those who have, you know
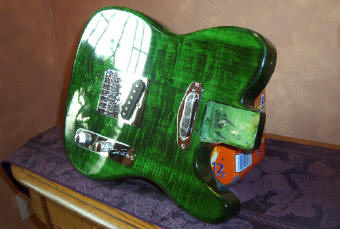
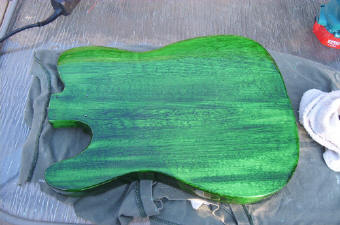
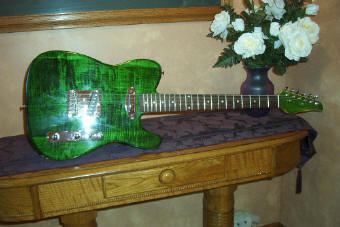
what I mean, for those who haven’t, DON’T.... As a technique, an easy way to mark the location of the bridge screw holes ( since they will be covered by the Maple ) is to take three pop rivets that fit the holes, I think I used 1/8" rivets, and cut the shanks off about 1/16" above the rivet top. With a file, file a small point as close to centered as possible on each rivet shank stub. Insert a rivet into each hole with the point up... the heads will keep the rivet from dropping into the hole. Line up the top with your outline and press firmly down on the top. This will transfer the center of each hole to the underside of the Maple. Now simply turn it over and drill the right sized holes. When you put the top back on, the bridge screw holes in the top should line up with the holes in the body. When you glue the top on, just drop three new rivets into the holes from the top down through the Maple and use them to line up the three holes in the top with the holes in the body, pretty simple actually. After all the routes were done, I used a 3/8" round-over bit on the top edges to blend the Maple top into the basswood body. If you’re careful, the round-over will end exactly where the two pieces of wood meet and virtually hide the seam. All the sand and seal was stripped off the body before I began to color the wood. For the color I just mixed the Moser’s dye with alcohol and began brushing the top with a foam brush. This is where it gets messy. You really gotta’ slop on the dye to keep from getting brush edge lines. If you try to be neat, you’ll just get lines. As soon as you get the color intensity you want, put it away for a day or so to let the alcohol flash off. The rest is pretty straight forward. I used the " paddle head " neck and developed my own headstock design. I didn’t want to hide the nice top with a pickguard so I ordered a Chrome trim ring from StewMac for the front pickup to allow full visual access to the Maple in between the front and rear pickups. The headstock was colored with tinted Nitro and I sanded through around the edges to show the wood color and make a faux border. I upgraded to Gotoh style tuning machines, redrilled the holes to a 10mm with a special tool I made. It’s a 10mm ream with the first 3/8" ground down to .305" as a pilot. It lets you center exactly when you re-drill the stock holes in a Saga kit headstock .which measure about .308"
I laid down about 8 coats of clear Nitro, wet sanded after the 2nd, 4th, and
6th coats, waited two weeks, then did my finish sanding and buffing. I use a
Micro Mesh sanding system. It lets me sand to 12,000 grit. After that, very
little buffing is needed. But I do use Norton Liquid Ice buffing compound.
The last steps were to put the guitar back together, restring it, and go
crazy. I use .009" D'Addario Nickel Round Wound strings. From what I’m told
by the new owner, it plays and sounds even better than it looks, Nuff’
said... |
|
 |
|
 |
|
 |
|
Here’s another Saga Saga...To all you aspiring Saga kit builders, beware if you strip Sand and Seal. I recently acquired an HT-10 ( P ) style body, and an LC-10 ( Les Paul ) style body and decided that ALL Sand and Seal definitely needs to be removed before attempting any type of finishing. This is true on any Saga body. I use a product called "Aircraft Remover ". Follow the manufacturers instructions and BE CAREFUL, this stuff will eat the steel off of steel, not to mention your skin ! As I was saying, I started to strip the finish off of the HT-10 body NOT the LC-10 body, that body has a celluloid binding that this stripper will destroy so I need to do that a different way. When I got the finish stripped off I wiped it down with a dry rag, then some Lacquer reducer on a Red Scotch Brite pad just to remove any remaining residue and set it aside for a day to dry. For those of you
not familiar with the Saga HT-10 and LC-10 bodies, they have a pretty nice
Curly Maple veneered top about 1/16" thick " glued " on ! The next day I
found two blisters on the HT-10 body where the Aircraft Remover had
apparently penetrated the veneer and softened the glue causing two " bubbles
" under the top. One was about ˝"X1" at the bottom the other was about ˝"X
2" at the top. I panicked, I didn’t know what to do, I was certain I had
ruined that body. After thinking for a bit I came up with a plan, after all,
I had nothing to lose by trying something. I took a piece of closed cell
neoprene about ˝" thick and 2" X 3", the type that companies use to protect
items during shipping, and placed it over the first bubble. Then I put a
Bessy spring clamp, the type that looks like a big Alligator Clip without
the teeth, over the bubble and sat it outside in the sun for about 5 hours.
When I removed the clamp the bubble was gone. Apparently the heat of the sun
softened the veneer and glue letting the clamp reseat the Maple. Having been
successful, I repeated the process and I got rid of the other bubble. Now
this may have just been " dumb luck " who knows, but if you’re careful you
may not have this problem, however, if you should, then this trick may work
for you. |
|
Great job, Dave -- Keep up the great work! |
|
| ATTACK HOME | "SAGA SAGAS" MAIN | ||||||||||||||||||||||||||||||||||||||||||||||||||||
|
|||||||||||||||||||||||||||||||||||||||||||||||||||||