|
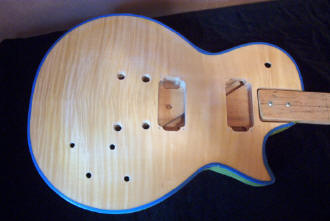
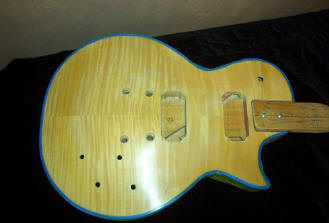
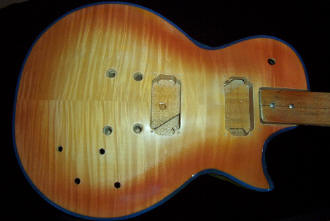
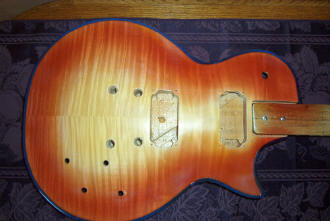
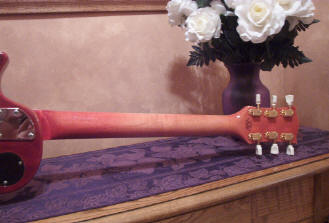
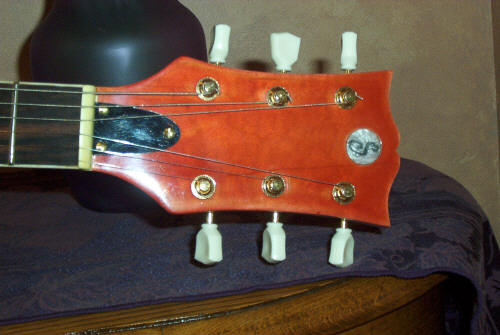
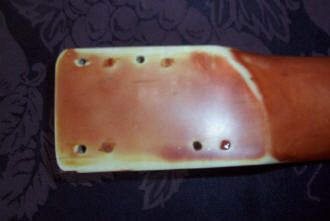
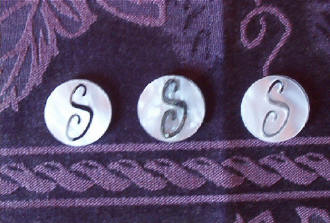
Dave Slusserhas been a great contributor to GuitarAttack. The first email we got concerned his new Saga LP project. He took our advice and put the guitar together before he started the finishing process. Well, as expected, there was a problem that he had to get squared away. He sent us the "Before" photo and the following note: Anyway, the reason I sent it is because I took your advice and removed some wood from the neck pocket instead of the neck. The advice paid off, BIG TIME ! The action is about as low as it can go and still not touch the strings... about 1/16" off the fretboard, but she went together. I have a dead fret at the 17 fret but only on the high E string and ONLY at the point of contact. If I bend the string up even a couple of thousandths above where it normally contacts the fret, then it's fine. So I need to get my fret crowning files out and tweak that fret. All the intonations are dead on the money, and she plays like a champ. When he finished the project, he sent more photos of the "After" guitar and several "in progress" shots. Here is the story: The colors are, Solar-Lux Deep Red Mahogany, Lawrence McFadden Red, and Lawrence McFadden Yellow, and the lacquer is Lawrence McFadden all purchased from Grizzly tool at www.grizzly.com. All the parts are from www.guitarfetish.com. The custom inlay in the headstock I have made for me by Bryan England at www.custominlay.com. I purchased the body first from a friend who has an online business selling Saga kits and other musical instruments. Later, I got the neck from him as well, thinking that someday I'd finish the project. It took a bit longer than I'd figured. I had some problems with the stains. It was a compatibility issue. Solar-Lux stain does not seem to mix well with McFadden lacquer. Each time I sprayed the Solar-Lux stain/McFadden lacquer mixture and began to wet sand, the Mahogany would start to sand away and I'd be left with a color that was getting lighter and lighter. It almost seemed as if the Solar-Lux was coming to the surface as the lacquer dried, and was getting sanded off. Even with 1000 grit paper, the Mahogany just kept going away. The Yellow sunburst base was McFadden Yellow. I had so much trouble with the back and sides that I kept adding more and more McFadden Red to the mix trying to get the color to level out. Eventually the back and sides became more Red than Mahogany. On the neck you can see the same problems. It started out as a Medium Red Mahogany, but as the job progressed, it became more Red than Mahogany. The fade on the back of the neck was intentional. It started out as all the same color, Medium Red Mahogany, but with the sanding problems, I kept adding McFadden Red and eventually ended up with an all Red neck at the heel end and slowly faded it back into the Mahogany on the headstock. The only way I found to get around the problem was to NOT sand each color coat, add 4 or 5 color coats, and then seal the color in with clear lacquer and just sand the clear. My feelings are that if you use just Behlen products, you probably won't have any of the troubles I did. My mistake was trying to mix brands, and I'm sure some reader out there will disagree with me, BUT, these are the problems I had! The whole project took 4 months of working as I found the time. There was some rework involved since this neck and body were from different kits. I don't recommend this as a project for the first timer. Stay with kits until you have the basics of guitar building down pat, then advance. There were some problems encountered that it takes a bit of experience to work out, but. with a little " build time" and a basic wood working shop, anyone should be able to do this kind of work. There are 20 coats of lacquer all together. It was sanded to 12,000 grit with my Micro-Mesh paper, and all hand buffed with Norton Liquid Ice, and 3M Swirl Mark Remover. I used no power tools this time for buffing. |
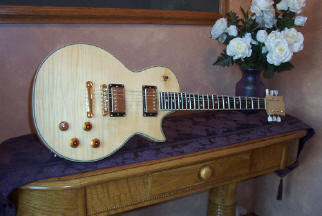 BEFORE |
||||||||||||||
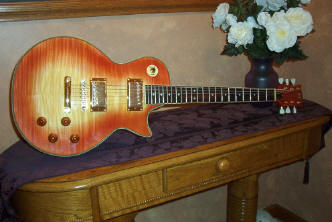 AFTER |
|||||||||||||||
 A problem with the stain! |
|||||||||||||||
 |
|||||||||||||||
|
|||||||||||||||
|
|||||||||||||||
|
|
|
||||||||||||||
| A shot of the back of the neck. Note the fade from the bottom toward the headstock. | A shot of the headstock. Note the inlayed "S" disk and the gold hardware. | ||||||||||||||
Great job, Dave -- Keep up the great work! |
|||||||||||||||
| ATTACK HOME | "SAGA SAGAS" MAIN | ||||||||||||||||||||||||||||||||||||||||||||||||||||
|
|||||||||||||||||||||||||||||||||||||||||||||||||||||