|
| Note from
GuitarAttack: This is a great story. Lots of great
techniques for everyone. From Collin Wynne
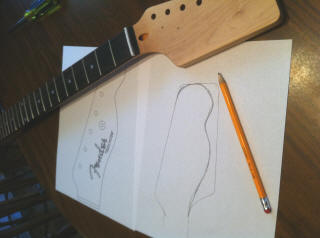
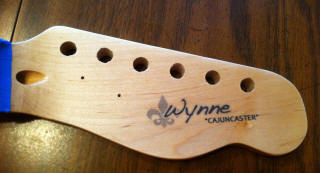
It was your site which really got me wanting to try one of these kits. I have four Ibanez guitars which is my brand, but I have always wanted a Telecaster, with no real "need" for one. This gave me a great excuse to learn something about guitars… I only know how to play a little, I knew very little about what goes into a guitar. Got the kit, and pulled it out and cataloged all of the parts. I noticed right off the bat that my neck was to big for the body… Made a note of that for later. I went through most of the stories here and at a forum for Telecaster lovers and decided on a Gloss Grey for my body color (In the Final Picture it looks blue for some reason, but still looks good). I decided to leave the neck wood and lacquer it only. First thing was to tape off the Fret board and then decide what shape for the headstock. I always thought the Strat Headstock was a bit too big and the Telecaster Headstock was too small. I went for a mixture of the two. After cutting the Headstock and sanding it down… I bought a custom decal on ebay from someone who makes them and soon realized he was charging $10 for 1/3 of a piece of waterside paper and simply printing it from MS Word. After he got it wrong twice, I realized that $10 would buy five sheets of waterside paper and I designed it myself in Photoshop. Went with my last name "WYNNE" and named it the "Cajuncaster" and added a Fleur-De-Lis (Which is standard here in South Louisiana). Came out great. I threw out the Tuning Machines that came with the kit and added a set of locking Tuning machines. The issue was that the original keys had 2 screws (Which was already drilled in the headstock) and the new ones had one screw hole. I had to bore out the main tuning key holes on the Headstock as well as fill the existing screw holes with wood putty. When I put the new tuning keys in, I figured out where the new screw hole would be and just screwed it in right there. So basically I had to fill in all twelve holes and drill 6 new ones. But the locking keys were much better. |
|
 |
|
|
|
|
|
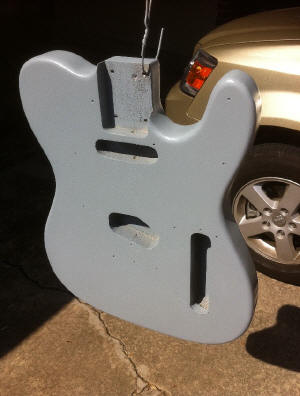
Now to the body. I
bought a couple of cans of Krylon Gloss Grey and some cans of Deft
Lacquer. Light sanding of the body at first to get the sheen off of it and
then a couple of coats of Grey paint. Left it a while… Another coat of
Grey… left it a while… cleaned it with a tack cloth. Another coat… After
about a week and 5-6 coats… I then was ready for the lacquer. Let them dry for about a week. They both turned out pretty good. Some orange peel on the body but after 1000 grit finishing sandpaper, it was barely noticeable. Remember, my neck was too big. I got a tongue depressor and some heavy grit sand paper (Which I wrapped around the tongue depressor) and sanded the walls of the body slot until the neck fit somewhat tightly. took some time and some of my paint chipped off, but it was under where the pick guard would be.
|
|
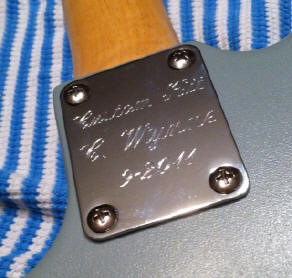
| Got the neck on with the engraved neck plate. Which came out great. Got the Bridge pickup in the pick guard and got all of the wires in the cavities. I struggled a bit with the bridge assembly but eventually go it. It look slightly crooked, but very slight. It will do. Time for assembly. Just the day before, I brought the neck plate to a jewelry store for engraving. |
|
|
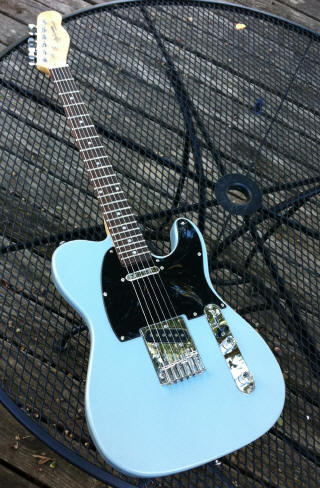
At this point the Neck with the new logo was dry. I did not want to lacquer the neck without letting the logo dry long enough. I put the body and the neck hanging via coat hangers… I started spraying the lacquer. I got 1 drip on the body and had to sand it off the next day… but I kept spraying, then sanding both the next and the today over and over again till I ran out of both cans of Lacquer. As far as the pick guard… I got a black pearl and a black one as well off of Ebay. Here was my dilemma. I had several people look at it and vote and most liked the white. Got the knobs in and screwed down and then the jack… Plugged it into the amp and Bam! It sounded like crap. So here is the hard part. I was determined to learn intonation. I knew nothing. After a lot of googling, I bought some files and a book on guitar repair. I had a feeler gauge already. So I: - Fixed the Major Bow in the neck with the truss rod. This was my biggest issue. Actually, my neck has more of a bow on the high side of the neck than the low. Somewhat frustrating, but after a while I got the low side straight with a minor bow on the high side. - The action at the nut was WAY TO HIGH. I got files and dug some caverns into the nut getting those strings down much lower. I then dropped the bridge as low as possible and then proceeded to hit each string starting at the nut and raising the bridge every so slightly. I learned that on this bridge assembly, each string is not on the middle of each screw, but to the side. You get a rattle when you pick an open string unless you raise one side a bit higher than the other. Each string had 2 adjustment screws for height. So I would raise one a bit higher than the other for each string. - Then harmonics at the Twelfth Fret… Fine-tuning the bridge and string length. Then I had to repeat the process again and eventually not started to sound better. Now it sounds pretty good and has moved up to "Preferred" Guitar status. Great experience… I learned a lot about guitars and also wood work. The guitar probably cost me a total of 145$ but with all I learned it is much more valuable than that. I am thinking of getting a white pearl pick guard for it. But aside from that… It is a great guitar. |
|
 |
|
|
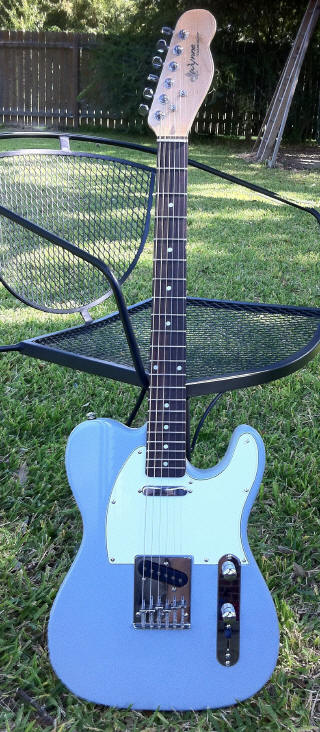
UPDATE: I sent you a guitar Saga TC Style set of photos while bout a month ago and I wanted to add the Final Picture... I did some modifications and and really happy with the way it came out... When you put the guitar pics and story up on your Saga page... please use this one as the final picture. Love the site and cant wait to have mine guitar on there. Cheers, Collin GuitarAttack sent this note:
OK -- did you completely repaint it? Wasn't it blue before?
Collin
|
|
| Great job, Collin. Whatever the color, nice guitar and thanks! | |
| ATTACK HOME | "SAGA SAGAS" MAIN | ||||||||||||||||||||||||||||||||||||||||||||||||||||
|
|||||||||||||||||||||||||||||||||||||||||||||||||||||