| Note from
GuitarAttack: This is a great story. Lots of great
techniques, even if it isn't a real Saga...what is a real Saga, anyway?
From Adam P.
Dear Guitar Attack,
Thanks for the great website. I have learned a lot by reading all the saga
sagas and your repair and building techniques section (multiple times). I
just finished my first build (see attached photos). It was a challenging
experience but the guitar turned out pretty good for a first build.
I have been trying to decide what style of guitar kit to buy for probably a
year now. I liked the PRS and LP style kits but budget constraints led me to
purchase a strat style kit in the end. I ordered mine from
www.byoguitar.com . Very similar to
the Sagas, basswood body, maple neck with rosewood fingerboard, cheap import
hardware and electronics. Once the kit arrived I set out assembling
everything first to check the fit of all the components. This turned out to
be a really good decision.
First problem was the routing done on the body. The bridge route seemed a
little off, so the trem bridge is almost touching one side when lined up
properly with the neck. However, the bigger problem was the neck pocket. It
wasn't routed deep enough at the factory! When I first strung up the guitar
the strings angled up from the bridge and sat on 22nd fret. It was
completely unplayable! I was pretty concerned at this point. I don't own a
router, so I knew I was going to have to improvise somehow. I don't
recommend doing this at home, and the experienced builders around here will
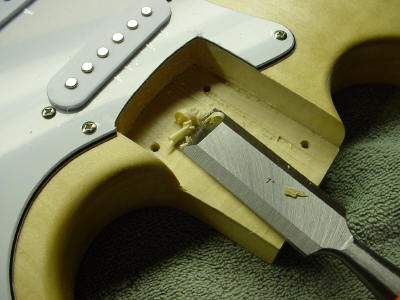
probably gasp at what comes next, but I set out removing about an 1/8 inch
of wood from the neck pocket with my wood chisels. A screw-up here could
have turned the whole project into firewood. I went really slow, taking off
small amounts of material, remeasuring, then repeating until I had a nice
level pocket. I was sweating bullets the whole time, but it worked.
Once I got the neck mounted I noticed it had some pretty bad back-bow to it
causing lots of nasty fret buzz. I adjusted the truss rod and did a simple
fret leveling. It's doing much better now. The strings I normally play were
a little heavier than the cheapies that came with the kit, so the extra
tension combined with the truss rod adjustments and fret leveling have taken
almost all the buzz out. Now that the guitar was finally in working order, I
disassembled everything, sanded the neck and body, and was ready to apply
the finish.
I tried to keep the finish really simple. I oiled the neck with Watco Danish
Oil. Plays really smooth. For the body I went with Minwax Polyshades in
Cherry. This is a simple finish--poly clear with stain already mixed in. I
thought I had sanded through the sealer that came on the body from the
factory.
I'm not sure if it was as bad as the nuke-proof stuff that is found on the
Sagas, but it was thicker than I thought so the stain is a little blotchy in
places where it didn't absorb fully into the wood. Because the stain wasn't
absorbing fully, it became a little tricky trying to get an even color when
applying subsequent coats. Overall it looks OK. If you look at it closely
though, you will see a multitude of flaws. But hey, for a first build it
works good enough. Maybe on my next project I'll break down and try a nice
nitro finish.
I did not upgrade any hardware or electronics. The tuners were adequate but
will probably be changed out at some future date. The trem bridge is also
adequate but may be upgraded later as well. The tremolo arm has already
stripped out--cheap soft pot metal. The electronics actually seemed to be
decent. All of the wiring was shielded which is nice and I shielded all the
cavities with copper tape. This thing is very quiet in single pickup mode;
so no noise problems here. The single coils all measured around 6k on my
multimeter, not high output monsters, but they have a nice vintagy vibe. I
did some slight mods on the electronics which seem to have improved the
sound from my initial mock up.
I've been playing this thing non-stop since finishing it. There's nothing
like playing an instrument you've built yourself. Its easily as good or
better than all the cheap imports down at the local guitar shop, and cost
half as much even after buying tools and finishing supplies. With a few
additional hardware upgrades down the road this thing will be a real piece
of work!
Thanks again and happy building,
Adam P.
|
 |
