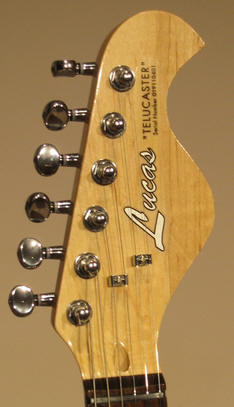
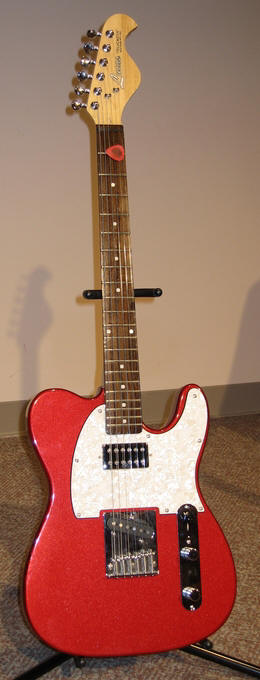
| Note from
GuitarAttack: This is a very cool paintjob and check out the
killer headstock decal! From David Choe:
My Saga saga really has been a saga. I ordered my T-Style kit in Jan 2005.
Yes, it really took me that long to finish it. But, I can definitely say it
was worth the time, effort, and dedication.
Actually, I didn't even touch the kit for almost a whole year. The reasons
for this were twofold. First, I spent a good deal of time planning out what
I wanted to do with it, as I knew from the beginning I wanted to customize
it some. Second, I was just plain lazy about starting on the work. Once I
did start, I did a little work at a time... when I had some. Anyway, here
are a
few comments on what I actually did do.
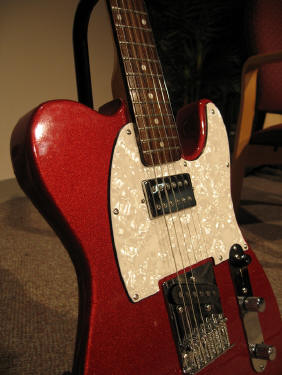
Paint & Polish: I used the Zinsser Primer, Dupli-Color Metal Specks Retro
Red, and Deft Clear Gloss (all sprays). I found that the metal specks paint was a bit
difficult to work with for a couple of reasons. 1) You get red dust
everywhere when you spray. I had to use a large cardboard box lined with
trash bags to spray in. 2) You can't sand it (according to Reranch
instructions) until after you put down the clear. I did end up sanding
through in a couple of spots and the red specks showed some silver. 3)
Because of #2 it was really difficult to do a spot repair, which was
necessary due to a couple of dings. I ended up using about 3 cans of the
metal specks and 3 cans of the Deft. Overall, though, it looks really nice.
Even the repairs are not that obvious because of the speckled color.
For polishing I used 800, 1000, 1500, 2000 wet sand steps. I had to use a
lot of 800 because there was light orange peel (again because of #2 above).
But, each of the successive steps went really fast. For a sanding block, I
used a 3" long piece of a composite hockey stick shaft. I glued a piece of
craft foam down one side. This worked really well as a backing because it
was firm with a little give. Most of the time I could get a good grip on
it. For final polishing I used Meguiar's ScratchX and pieces of old
t-shirts. This worked really well and I got a nice glossy finish.
For the neck and headstock, I used wipe on poly (satin) per the Mattocaster
instructions. This was really easy. I think I put too much on the fretboard,
though. It's basically shiny.
One painting tip for other newbies: Make sure to tape off the neck pocket!
Headstock, Tuners, & Logo: I cut the headstock using a coping saw. This
worked fine except for the fact that the maple kept causing the saw blades
to break. Also, the headstock is composed of 2 pieces of wood. They started to separate a little. So, be careful. I
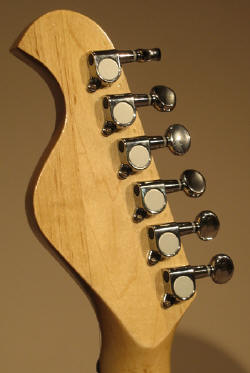
ditched the standard tuners for some little bean ones I ordered from guitarfetish.com. I liked the look and feel of these much better.
I had
to manually ream out the holes and drill some new screw holes. This worked
fine, except that some of the old holes can be seen on the rear. Also, just
for fun (and to hide at least one of the stock holes) I made the tuners
horizontal.
I created and printed the logo per the instructions on projectguitar.com. I
was able to find a Fender-ish font on the web. If I were to do it again, I'd
find something thinner than a transparency. (I've heard that some people use
water-slide decals like the ones that come with model airplane kits.) Also,
go easy on the spray adhesive. Mine didn't dry entirely clear.
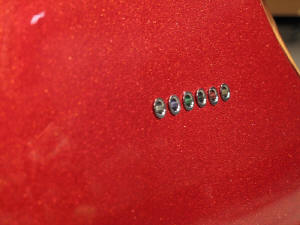
Ferrules: This was another change I wanted to make. I would be very careful
in doing this and suggest you use a drill press. I didn't and I had to
rework some crooked holes. But, they came out looking pretty nice! No? After
the paint was finished, etc., I used a drill bit to manually ream the holes
out (removing, paint, etc.). Then I pushed the ferrules in by hand. There's
just enough friction for them to stay put.
Pickups: I replaced the Saga stocks with a GFS Dream 180 HB (neck) and a
Vintage Alnico 62 in the bridge. These sound really nice and have totally
different qualities.
Pickguard: To accommodate the neck HB, I ordered a pearloid white pickguard
from guitarfetish. Of course, had to plug and redrill the holes. But, it fit
very well.
Wiring & Shielding: I wired the pickups together with a custom 5 way switch
to give the following combos: 1) HB, 2) HB-split, 3) HB+SC, 4) HB-split+SC,
5)SC. This gives me a very nice array of sounds. It also required me to
dremel out the control cavity a bit. One other thing about the wiring, since
I wasn't using the stock pots, I rewired it using small connectors, like the
one used for PC cooling fans. This allows me to easily disconnect things
without having to resolder. The connectors are small enough to fit through
the wiring holes without a problem. I also shielded the cavities with some
copper tape from guitarelectronics.com. The pots were switched to 500K. All
of this was pretty much per the Fender wiring diagrams for a Fat Tele. The
one thing I left out was a resistor in the original wiring. I think this is
a treble bleed (to keep the SC from sounding too shrill). But, I found that
it sounds fine without it.
Bridge: The stock bridge seemed so-so. So, I ordered a new ebay special.
This was a bit heavier and chromier. The downside of this is that the bridge
makes a bigger ding if your drop it on the paint, like I did. Doh! Also,
this allowed me to do the string-thru. One issue I had with both bridges is
that the high-E string is a bit too far toward the edge of the neck. The
Low-E is fine. I think this might be a string-spacing issue. But, so far it
hasn't been too much of a big deal.
Frets: I did the pre-finish assembly after I had the primer and red-specks
on the body, but before clear. I used some small nuts as temporary ferrules.
During this stage, I realized that some of the frets had some high points
toward the outer edge, i.e. they were too flat. So, I attempted pulling them
and re-seating. Uh... I recommend practice on a junk neck and a 40w
soldering iron. It's not too ugly, but I had a hard time getting them back
in. The neck has some "light" scaring. It would have been a lot easier to
just file them down, which I had to do afterward anyway. For this, I used a
piece of sandpaper (600) taped to a 1/8" thick piece of aluminum sheet. I
used the edge of this to sand the offending frets down. In the future, I
think I'd like to do a full re-fret job. But, not right now!
Big thanks to guitarattack for all of the helpful info and suggestions!
One other thing. The inspiration for the headstock logo is my son Lucas.
He's 2-1/2 and is a budding guitarist. Ha!
- David Choe
rev.dchoe@gmail.com
|
|