|
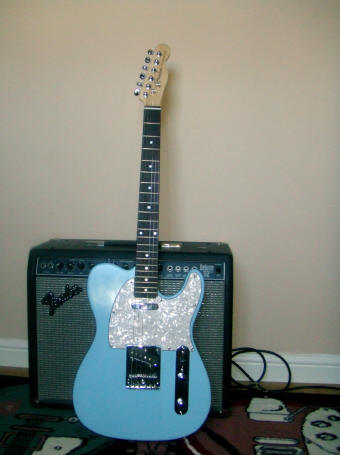
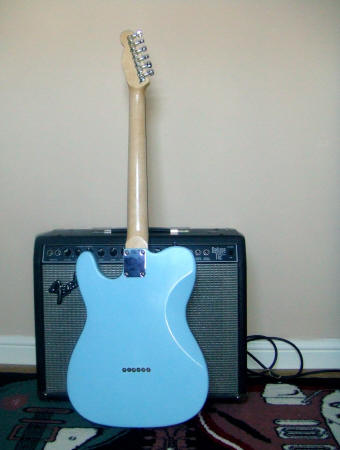
From GuitarAttack: -- From the UK a very cool color and ferrules
on the back! From:
peter.bower.bower@btinternet.com
I was looking for a simple kit as a first build project and having searched
the net identified that a SAGA T- style kit seemed to match all my
requirements. I found one for sale on e-bay at
www.diyguitarshop.co.uk and
received it within a few days of ordering.
For the price I paid I was really impressed with the quality of the body and
the neck but decided that most of the hardware could do with an upgrade. I
also wanted to string it through the body as per a standard T-style.
I ordered a replacement chrome six saddle bridge, a heavy chrome control
cover plate,dome knobs, string ferules and string trees from
www.axetec.co.uk. They also supplied a pair of matched Iron Gear Pickups .
I drilled the body with a Dremel using the holes in the bridge plate as a
guide. This is a bit tricky but not that difficult. With the bridge screwed
in place I drilled the two holes for the top and bottom E strings all the
way through the body and the remainder about halfway through. I then flipped
the guitar , lined up the bridge plate over the two outside holes marked off
the inner holes and drilled to meet up . This way I ensured that the
spacings were even and in line on both sides. I then used an 8mm drill to
widen the holes in the rear to take the ferules.
(Note: Interesting technique on the
ferrules. Ed.)
Once this was done I sanded the body with 800 and1200 grit to prepare for
paint . I wanted to use an authentic Fender colour if I could and found that
Steve Robinson at
www.manchesterguitartech.co.uk carries a full range of
Fender Colours in nitrocellulose laquer as well as primer and clearcoat
although I guess I may use standard auto repair primer and clearcoat next
time. ( Steve's site is already featured in your pages giving a good build
overview ). Because of airfreight constraints I couldn't obtain supplies from
Stewmac or Reranch in the USA. I gave the body four coats of white primer,
five coats of Fender Daphne Blue Lacquer and 5 coats of clear, sanding with
wet 800 and 1200 grit between coats . I then left the clear to harden for
four or five days before finishing with 1200 grit and finally auto rubbing
compound . A final polish with MER auto polish left a hard, smooth factory
finish.
A search on the net turned up a cad drawing of a Telecaster headstock which I
sized to line up with the holes in the peghead and it was simple to cut with
a Jig saw and sand with the Dremel. The fretboard was masked and neck was
sanded and given five coats of clear and finished in the same way as the
body and I also managed to find some decals which were added or
decoration.
Assembly was pretty simple. I used the Saga pots, three way switch and
wiring and simply connected in the Iron Gear Pickups in place of ones in the
kit. Better quality knobs and a heavier chrome control cover plate added to
the finish.
Before attaching the neck I got hold of some Wilkinson 'Grover' style tuners
from www.blackdogmusic.co.uk. I had to widen the peg holes using a reamer
but this wasn't a problem and I also added two roller string trees.
The neck was then screwed in place and as a final touch I added a pearl Tele
Pickguard which I got from www.axesrus.com. One set of Ernie Ball Slinkies
later I was ready for setup. This proved much easier than I expected and I
used the great advice under ' resources' on The Fender UK site. I didn't
need to adjust the neck or alter the nut and once the pick up height and the
string lengths were set I had a great sounding guitar with no flat spots or
fret buzz. It sounds great both clean and driven and looks worth much more
than I paid. Much of the fun has been in finding the bits and putting them
together and I am now looking forward to my next project.
|


