Special Thanks to Jim Hintzen for providing this article.
When I decided to customize my first guitar, I figured that since I was
going to eventually replace everything on it anyway, all I was concerned
with was the body and the neck. I found a shockingly sweet Fender Squier
from China that played like a dream. I planned to put a Floyd Rose on it,
but the price tag of an Original Floyd Rose bridge and the stiff installation charge put me off this idea.
So I began a quest to mod it into a guitar that would stay in tune. Right
off the bat, this guitar stayed in tune fairly well, so that was a good
start. I paid my guitar tech a lot of money to put in the much-vaunted
Hipshot Tremsetter, and still my guitar didn’t stay in tune worth squat. In
fact, it was way worse than when we started.
About this time, a friend of mine graciously ( and bravely! ) loaned me his
Peavey Strat copy to practice my fret leveling and dressing skills. While I
had it, I started doing some of the same things I had seen the guitar tech
do to my Strat, I played around with it for hours, and by the time I was
done, it stayed in tune perfectly! Much better than my Strat, which I had
spent well over a hundred bucks on just having the Hipshot system installed,
etc. When I realized how well his cheap Strat copy stayed in tune, I ripped
the Hipshot out of my guitar, tried the WD Trem Stabilizer, with similar
dismal results, and started tinkering. Many hours later, I was rewarded with
an extremely well working tremolo system. And, I felt like the guitar was
truly mine after doing the work myself. Here’s what I did.
1 ) Tune In, Turn On, Drop Out – I didn’t have any problems with my
tuners on the Strat – they were fairly decent quality and held a tune well.
You’ll want to check your tuners out before you start working on the tremolo
system. If they keep the guitar in tune while doing bends, etc., you may not
ever need to replace these. Needless to say, if you have cheap tuners that
don’t hold a tune, you’ll have to replace them. You don’t necessarily need
to go buy $80 Locking Sperzels, though, I have great luck with the stock
Squier tuners, which you could pick up on eBay for $10 or $15.
| Every guitar tech I know
disagrees with me on the next part – but MY guitar stays in tune, so go
with what you know, right? They say only use a turn or a turn and a half
a winding when putting on new strings, but I say have as much extra
string length as you can get on the string poles. I string them like
this then wind the excess underneath, making sure each succeeding length
is snug and that they each exert upward pressure on the lengths above
them. My thinking is that this works to “lock” the string in place.
Note: This is the technique BB
King and a number of other famous players use. |
|
2 ) Forestry 101 - Remove the “second” string tree from the neck of
the guitar. It’s the one that holds the G and D strings. According to the
experts, you don’t need this one to hold those strings to the proper angle,
and I don’t believe Fender even includes it on their Strats anymore. The
strings sometimes get hung up on the string trees, so this is an
improvement.
3 ) Slippery Nuts – The Nut is a major source of hang-ups for
strings. If you don’t want to retro-fit an LSR or Wilkinson roller Nut, make
sure your string channels/ grooves in the Nut are cleanly filed and just
wide enough to ensure smooth string sliding across them. Be really careful
about this though, you can easily take material away from the nut, but you
obviously can’t add any back. I’m sure a competent guitar tech would do this
for you for a couple bucks.
4 ) Lube N’ Oil - Now here’s the big trick that Eddie himself used to
use before he met a guy named Floyd Rose. Take a small amount of Vaseline
and rub it into the string channels in the Nut. Then, take a regular pencil
with a sharp point and rub the point thru the string channels until the
Vaseline turns black. The graphite from the pencil provides lubrication so
the strings don’t get caught in the nut, and the Vaseline holds the graphite
in place. After you finish this step, apply the same way to the underside of
your remaining string tree. You don’t need to re-lube the nut every time you
play the guitar, but you will need to re-lube every once in a while. At
least as often as you change strings, or whenever needed.
5 ) Pretty in Pink – I used Ernie Ball Pink Slinkys strings. .009 to
.042 gauge, and they worked really well in both setups. I don’t know if
other brands of strings stay in tune better or worse, but these are what I
use on all my guitars, so that is how this system is set up.
6 ) Bridge of Sighs – The other place strings often get hung up is on
the bridge saddles. The saddles with my Squier were cheap, and developed a
burr almost immediately. Light sanding took it out, but it would have just
occurred again, so we replaced them with graphite saddles for about $30 and
that solved the problem.
There are two schools of thought on bridge setup – floating and flat. I’ve
had luck with both setups, you’ll have to decide which you like and which
works better on your guitar. Floating worked best on the Peavey for me, and
flat worked best on the Strat.
The whole principle behind a tremolo that returns to “Zero-Point” is that
you want to have equal pressure pulling a ) from the strings and b ) from
the tremolo springs. That way, after you dive-bomb like a crazed kamikaze
pilot, the bridge will come back to the exact position it started from (
where the strings were in tune ).
Another thing you’ll want to do if you have a “Vintage” six-screw tremolo
system is to loosen the middle four screws which connect it to the guitar,
effectively making it a “two-point” tremolo system.
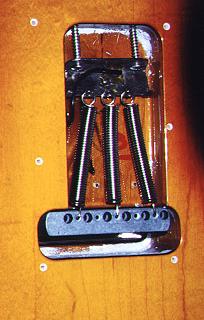
| 7 ) Hope Springs Eternal
- When you open up the Tremolo Cavity Plate in the back of your guitar,
you’ll see the “Claw” and 3 to 5 springs. With the Pink Slinkys, you’ll
only need to use 2 springs, or possibly 3. Remove any others. Mine were
installed in the “Tent with a Pole in the Middle” configuration. I
removed all 3, then re-installed two of ‘em straight up and down, one on
either side of the claw going in a straight line down to the bottom of
the bridge.
Now you’re going to start experimenting. This will take lots of
patience. Trust me. If you get discouraged, feel free to take a break. I
got disgusted during this phase and left to get something for dinner (
pricing Floyd Rose systems while eating ). I came back home – and Voila!
The system was suddenly working! During this step, you’ll try different
sizes and strengths of tremolo springs, and different tension on from
the claw – until you find the magic equilibrium which results in a
“Zero-Point” tremolo system.
Note:
See the two screws that hold the spring claw (top of the photo) in
place? If your bridge is raising, they're too loose. If your bridge is
too low, they're too tight.
|
|
8 ) Floaters - If you want a floating
bridge, you’ll need to buy a small ruler for small measurements ( I got mine
at Radio Shack for two bucks ). For a floating bridge, you want the end of
the bridge to sit about 3/16” above the surface of the guitar. You’ll adjust
the two screws that hold in the Tremolo Claw until you achieve this height.
The advantage of this system is that you can do upward bends on your Trem
bar.
9 ) Flat as a Pancake - If you want a flat bridge, you’ll adjust the
screws that hold in the Trem Claw until the bridge rests flat against the
guitar. During this step, I would just take the screwdriver with me, play
the guitar, and then adjust the Trem Claw screws accordingly. If it seems
like if the guitar comes back in tune sharp – that would mean there’s too
much pull from the springs – so you would loosen the Trem Claw by screwing
the Claw screws counter-clockwise. Conversely, if the guitar comes back FLAT
– you have too much pull from the strings, and want to tighten the Trem Claw
screws clockwise. Continue this step until you can do whammy bar bends that
come back into tune. ( Yours may well be different, but I ended up with the
screws on my Strat screwed almost all the way into the guitar. )
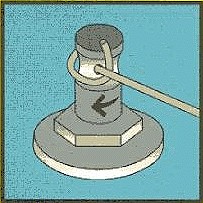
10 ) Keeping it Stiff – If you’re using a Fender Tremolo system like
I am, you’ll notice two things quickly – 1) The screw-in tremolo bar wiggles
back and forth in its’ screw cavity, and 2 ) it continually comes loose, and
you have to screw it around another turn to tighten it up so it stays in the
same position.
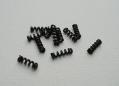
| The way to cure both of
these is to get Tremolo Bar Springs from Fender. You should be able to
find these at any guitar repair shop, or you can order them on the web.
You drop them into the Trem Bar hole, and they exert an upward pressure
on the Tremolo Bar - keeping it stiff and in position. If you’re using a
Vintage Tremolo Bridge like me, it has a hole in the bottom and the
spring just falls through. You take your guitar down to Ace Hardware,
ask them to help you find a set screw that will fit into the Tremolo Bar
Hole. Use the Allen Wrench to screw it all the way in so that it can’t
go any further, and it makes a “bottom” to the hole and holds the spring
in. It does take up a little of the room in the hole, though, so just
snip a little bit off the end of the spring and it’ll work just fine. |
|
11 ) A Short, Sharp, Shock - If your
guitar does occasionally come back sharp or the G string is out of tune or
whatever, give the whammy bar a quick slam down towards the body and back,
and it will snap back into tune.
12 ) Metal Rules! - Grow your hair out, wear leather, pretend it’s
the 80’s and go nuts dive-bombing your heart out!!
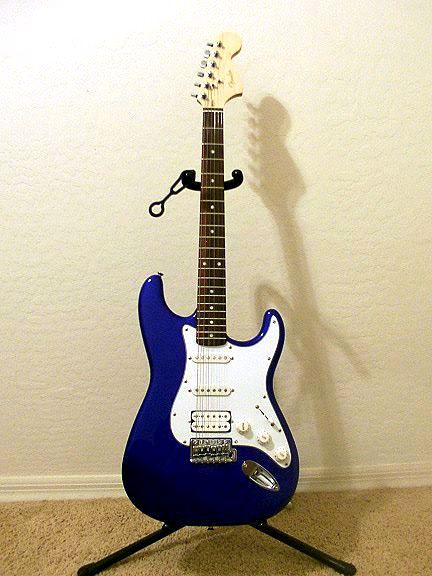
| By the way, here’s my
Customized Strat. It’s got all Seymour Duncan’s – an EVH Custom Shop in
the bridge, Hot Stack in the middle and Vintage Staggered up in the neck
position. It’s had its’ frets leveled and dressed and the action is
lower than a snake’s belly! I’ve had the electronics cavity fully
shielded, and replaced all the pots with top-quality units. It’s a
player, for sure, and she’ll always be my Number One. |
 |
| |
|
|
