|
FILLING A TREM CAVITY...AND A KILLER PAINT JOB! |
|
FILLING A TREM CAVITY...AND A KILLER PAINT JOB! |
|
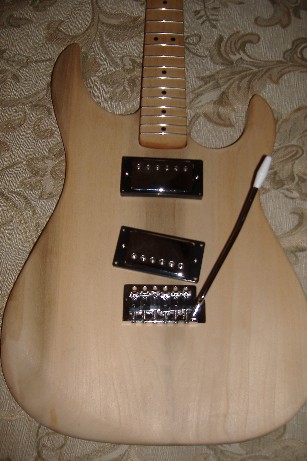
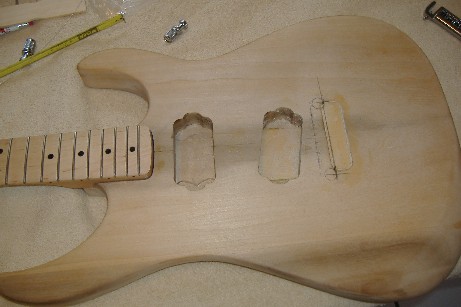
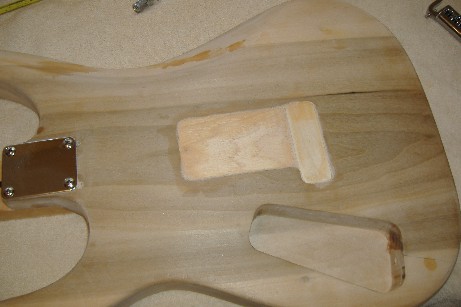
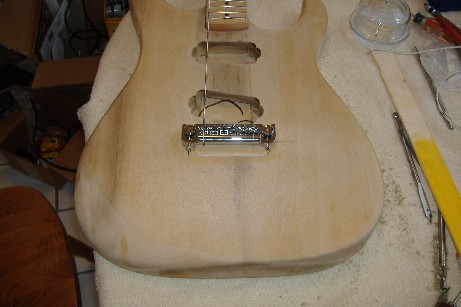
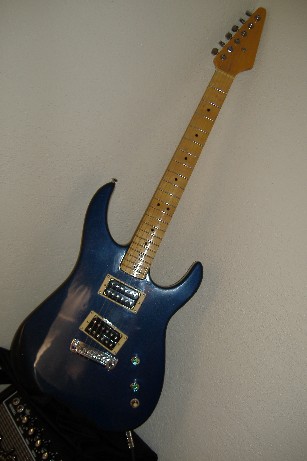
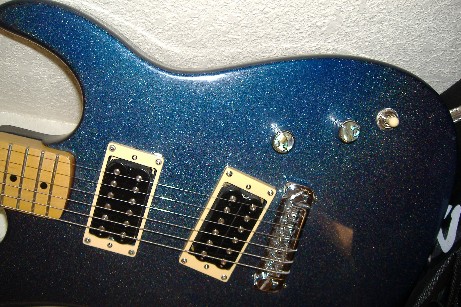
Special Thanks to Eddie Wellman for providing this article. Hi there! I wanted to build another guitar but I wanted something a little different from all the kit guitars. So, I put my own kit together and it had to be inexpensive. I found the body on E-Bay for only $10.50 plus $16.00 shipping, and it is not to bad. It's made of popular and it was made sometime in the 80's. When I got it the body it did look like it was made back then! The neck is from a Starcaster, costing $15.00 with the tuners. I found a set of Ibanez pickups for $9.50. The pots are new 500k numbers with a new cap and the switch is from a Les Paul. The guy I got them from gave me four pots, two switches, two caps and four different color switch caps all for around $20.00. When I first started to get all the parts together I was going to install a Fender style trem bridge, but I really wanted to try the wraparound style. So now begins the saga! As you can see in the photos I fist started by filling in all the holes that were not going to be used. This wasn't to bad to do. I used a power saw to cut the basic shape and the used a lot of sandpaper to get the shape down to where it fit tight. I don't own a router so I had to fill the trem holes in with two piece of wood. I did find out the most people that do this use a router to rout out the hole so you can use one piece of wood. After I did all that I put the neck in place and then measured for the new bridge. Boy I got say this is the first time I tried to do anything like this I must have taken measurements about a 101 times before I drilled the holes. Call it beginners luck because I got it spot on! Wow that was a relief. I was excited to hear what it would sound like, so I installed some pickups from a Saga kit I built and used them just to try everything out. So just like the Saga kits I put the guitar together before painting it or doing anything else. I am glad that I did because just like other builds I found all kinds of little things that needed to be done like the neck adjustment and getting the bridge set up and filling the nut down. After all that I played it for about 3 weeks, then I took it apart and started on the painting. I started with the neck. There is a paint store next to where I work, and they made some custom stain for the neck. I wanted something close to the Fender neck amber but not the exact color because I wanted it to be my own! So, being a printer, I started to look through my PMS color charts and found a color I liked and took that over to the paint store. They matched it up with no problem. The other thing I did to the neck before staining it was to sand off the Starcaster decal and I also rounded off all the edges of the headstock to give it a softer look. Once the stain was on I put on about a half a can of gloss lacquer on it. If there is one thing I learned from the other two guitars I built is don't be afraid to put some paint on because it beats sanding through. I let the neck dry for the next three weeks while I started on the body. Now this is where things went from bad to worse. Remember I told you that the body was made in the 80's? Well there was something in the wood that just didn't wouldn't to go away. I don't know what it was but it caused me to waste a lot of paint before I found a way to seal it. I tried all kind of ways to seal it but nothing was working. Every time I though I had it I would spry the body and the paint would wrinkle up or it would not dry. I almost gave up so I let it set for a day or two -- enough time for me to cool down. I went back to the paint store to ask them if they had any thing that would seal off this body. They recommended a shellac-based primer. That did the trick and I had no more problems with the paint. (Note: Shellac is a good primer for just about any finish. I use it for all of my guitars - Ed.) Because I live in Florida I had to wait for a good day to paint because of the humidity. Once the weather was good I sprayed the body with a dark blue color. It has some small flakes in it but I wanted something more, so I used Dupli-Color clear Effex (available at AutoZone) and WOW! You should see this body! It came out so cool looking! One of the things I like about it is comes in a spray can and you can use it over any color. The other thing I like about it is you can use a little or a lot. The more you put on the more flake there is. It�s cool too because it makes the paint change colors in different lighting. What I did was I put about 3 to 4 coats of clear on then put the Effex on then I put on more clear coat. That way it gives it a lot of depth. 3D kind of stuff. I use to do stuff like that when I would paint cars. The only bad thing in this was where I sealed up the back trem route. You can now see where I made the fill, but at least it's on the back. The next time we have a good weather week here I may try to fix it. After letting the body dry for a week I started to put it all back together. I chose not to color sand it till after I put it together just in case I had any other problems with it, and again was I glad I did just that. After putting it back together nothing was the same. I had to reset everything. The neck the bridge were not lining up. The only thing I could figure out was I had striped the body five times and that somehow changed the wood. I've had it together for two weeks and nothing has changed. I had to counter sink the bridge studs down into the body to get the string action low. Well, as you can see the guitar came out looking cool . After all the hard work I think I got what I was after. It's a little different and the sound of this guitar is awesome. The Ibanez pickups sound great. I don't know the make of the body but to me looks like a cross between a Ibanez and a Kramer. The only thing I might change is to add a set of chrome pickup rings and a nice set of zebra pickups. I spent around $200 for this guitar not counting labor or looking on eBay! I did this just to see if it was possible to build a killer guitar with little money. Everything except for the strings were bought off eBay. Again I love the way it looks and sounds I don't know if I will ever buy another store bought guitar again! I love to build them because I can't build hot rods anymore so this is the next best thing. I am calling this guitar Eagle Blues 2. If anyone would like to you can always email me at eagleblues@cox.net. I would like to hear from other who share a love and passion for guitars and guitar building. Thanks again to GuitarAttack for the best web site for guitarists everywhere!
|
|
|
|
|
|
|
|
|
|
|
|
|
|
|
|
|
|
|
|
| ATTACK HOME | REPAIR MAIN | ||||||||||||||||||||||||||||||||||||||||||||||||||||
|
|||||||||||||||||||||||||||||||||||||||||||||||||||||