|
THE FM3 BECOMES A GOLDTOP |
| We were exceedingly proud of the FM3...a
fine guitar with some great pickups. However, ill-fortune came our way, and the
guitar got pretty banged-up in shipment from Germany back to the United States. We
are not going to play a blame-game...the bottom line is that the guitar was
unplayable when it came out of the box. When we unpacked the guitar, it looked like a big piece of machinery had been dropped on its top. The box itself was in pretty good shape, but the guitar was ugly. The fingerboard had two frets banged-up, and the top had five pretty deep gouges on it. The front AttackBucker pickup had also been smashed. After some careful analysis, it was clear that the guitar had to have a finish that would cover repairs that had to be made to the top. We decided on a Gibson-like Goldtop with natural sides, back, and neck. For help, I turned to Mr. Lester at the ReRanch. Note: The FM3's wounds were so hideous that we chose
not to show them on Guitarattack.com! |
|
| Step 1 was to remove the hardware and do some analysis
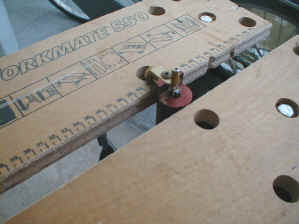
on the damage. We steamed the neck out, and found that it was in pretty good shape. All goldtops need binding, so it was decided to install Les Paul -like binding on the guitar. This would serve a dual purpose. First, it would look cool. Second, it would allow us to remove the roundover route on the top where some of the damage was found. This is a Stew-Mac binding attachment for a Mototool. I clamped it in my Workmate, and routed the channel for the binding. I had to use it like this (rather than "free-hand" as shown in the catalog) because the FM3's top is beveled in the cutaways. I could not use a uniformly deep channel, and this was the best method. |
|
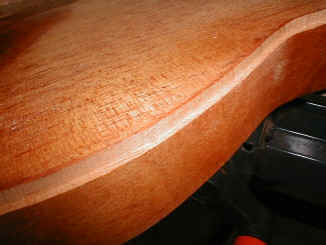
| The binding channel turned out great. Remember to spray a light coat of lacquer on the area to be routed to keep it from getting fuzzy. This ledge is routed to accept the cream 9/16" Les Paul binding from Stew-Mac. |
|
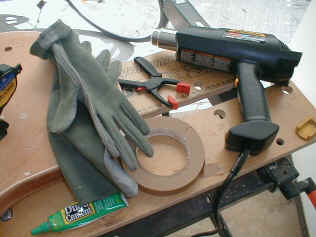
| Crucial tools for binding, clockwise from the right: 1. Wagner Heat Gun. Critical for heating the binding to give a smooth curve around the tight cutaways. 2. Stew-Mac Binding Tape. Very sticky and lasts a long time. 3. Duco Cement. A Wal-Mart special, awesome for binding. 4. Nomex Aviator's Gloves. Available from surplus stores, these are great for handling warm binding. Protect those picking hands! 5. Clamps. All types for holding the
binding on the tight curves until you get the tape in place. |
|
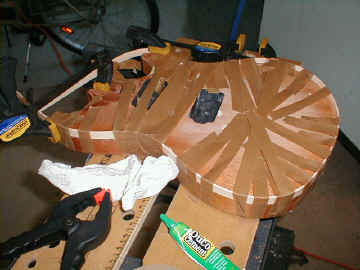
| We started the binding job on the strap-button end of
the body and worked up both sides toward the cutaways. You can see the binding
sticking up above the body -- this will be trimmed with a flush-cut saw. We did this
to ensure that the binding channel was deep enough to cover what needed to be covered. The lacquer sprayed earlier keeps the glue from seeping into and staining the top and sides. Having the side binding glued and strong makes binding the cutaways much, much easier. Take your time here -- make sure there are no gaps between the body and the binding. Note -- you can see some of the filler around the tape. Trust
us -- the damage was pretty bad. |
|
| Page 2 | |
|
||||||||||||||||||||||||||||||||||||||||||||||||||||